Friday, July 29, 2011

Garden Crashing - A Full-Yard Garden

Earlier this week we visited some friends that my husband made sort of through work. Garth & Berri are glass blowers in town, and have this amazing garden that takes up pretty much all of their acre and a half property on the outskirts of town. When we arrived they welcomed us and then toured us through their gardens for over an hour - yup, their gardens are that extensive! We got to try out a cool garden tool they use that apparently makes their weeding lives way easier, we talked with them about their wheat crop, and they showed us how they efficiently water their plants.

They have a low little house that is built into the earth, and just installed a row of solar panels this spring. In front of the house they have a great herb garden with some ornamental plants & grasses in there too. In front of the herb garden, they have row upon row of veggies!
 
Below you can see the peas, onions & celery, peppers, tomatoes, more peppers, potatoes, and then corn.


Looking across from the house end of their property you can see their garage/shed and attached greenhouse, along with some fruit trees, more ornamentals (lots of flowers for cutting). Their raspberries, strawberries, and wheat are down at that end too.

They have numerous areas that are just great mixes of perennial plants. It was shocking just how short of a time they have been there working the gardens - about 3 years, the same length of time we've been at our place. They have accomplished so incredibly much in that time! I can't wait to see how much more function and beauty they accomplish in the next 3 years time.
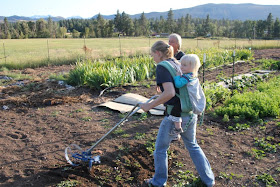
  They have this neat little garden hoe-type tool that sits behind a wheel and you push it. As you push the wheel along the surface of the soil, the hoe rakes along just under the soil and cuts all the root and slightly disturbs the soil. Weeding without bending over, and without vigorous hoeing - perfect! I got to try it out, and it was easily done even with Little M on my back.


Here is a close up of the tool. They are made & sold by Valley Oak Tool Company, which is based out of California. You can check out their website if you are interested: valleyoaktool.com. They are a bit pricey, but think of the rows upon rows of weeds you could hoe quickly and easily with this thing! I suspect I would have to space my rows a little wee bit further apart to be able to make use of this, but maybe in the future I won't plant everything so close together :)

This is their wheat patch. This year they are just growing one variety, although in previous years they have tried several to see which one did best here and tasted best. I tried to remember which type this is, but I forgot - I'll just have to ask again if we visit again. The wheat variety is neat because it doesn't have the long spines off the seeds, so it is easier to deal with by hand. They use their wheat for baking - this past winter they made pancakes and other things with their home-grown wheat. How is that for self-sufficient living?!

They have irrigation shares in one of the valley ditches, it actually runs right between their land and the road. They have a great setup for watering all of their crops. They have their land divided into 8 zones, and they have a timer set up so that each of the zones gets watered at a certain time for a certain amount of time. Because they get their water off of an open ditch (unlike our piped gravity-fed irrigation water), they have to have an electric pump to pressurize the water. They also have several filters to get sediment and other things (for example we often get crayfish in our pipes...) out of their pipes so that their sprinklers don't clog up.


 Speaking of sprinklers, they have several different types that they use around the gardens, but these were the coolest. They had these jets that you can see, and then the top spun slowly around. but instead of the jets always spraying out water, when they got facing the shrubs on the right, they cut out! This sprinkler only watered in 180 degrees, even while rotating! Awesome, right?!


I definitely got lots of new ideas, both of veggies to try my hand at in the future (they sent us home with some kale and I had forgotten how much I loved it!), and also ideas for garden layout and irrigation set ups. We would have loved to stay longer, because there was still so much to see (including their root cellar!), but the sun was about to set and Little M was starting to get a bit fussy since it was past her bedtime.

Hopefully we will be able to go back and visit them again, and maybe they will be able to come over and visit our garden! I love touring around other people's gardens, seeing what plants they grow, how they organize their space, learning new ways to do things, and seeing what works for their spaces. I always learn a lot and come home feeling so inspired :) Thanks Garth & Berri for being so welcoming and friendly and for sharing all sorts of gardening tidbits!

Wednesday, July 27, 2011

Easy memo board rehanging

My husband and I have had this memo magnetic whiteboard basically since we started dating. Initially it hung at his house in the bedroom and we would keep notes on it, pictures, tallies, or to-do lists. It was initially hung with double sided sticky foam on all 4 corners. It stayed in that same spot until after I moved in with him, although it was removed once or twice for painting projects in the room. I think the first time it came off the wall it took some paint and perhaps even some of the drywall coating with it, which didn't make me happy, and obviously the stickiness of several of the foam pads was seriously reduced. After that it likely fell off the wall a couple times, and so when we moved into our current house it never got put back up on the wall.
 Instead for the past 2 years it has floated around, sometimes being used, sometimes being stuffed into a closet somewhere. It always annoyed me when it was floating around on the table, or in the entry way on a shelf, because it took up space and just looked sort of junky since it definitely didn't belong there. So last weekend (after it had been brought back out and was being used for to-do lists again while surfing around the table) I decided to do something permanent about it.

First I tried to use some string or elastics pinned to the back of the board, and then thumb tacked to the wall. Didn't work. So then I got more creative and went looking for something sturdier. I was initially thinking plain paper clips, but all I could find was those larger paper clips, alligator clips I think they are called. I cut one in half, bent it around to the shape I was looking for, and used epoxy glue to glue the clips onto the back of the board.


Then I waited for a couple of hours to let the glue set, and I hung it on the wall with thumb tacks spaced so that I could wedge markers up there. Perfect! Now I have a easily modifiable and visible to do list for myself where I can also put important notes up where my husband can see them too! Now I just have to get him to keep an eye on the board for those important notes...

It was simple and easy, and I'm amazed that I put off doing something like this for so long, because it makes my life so much easier, and my table so much cleaner!

Monday, July 25, 2011

Updates to our Entryway

I have been meaning to share what we've done to our entryway for a week or two now, and since Melissa at Houseography is doing a house tour and today is Mudrooms, I thought this would be a perfect time to share what we have done to make a better landing area in our entryway, making it function more like the mudroom we dream of in the future (for more of my dreams for the entryway you can check out my entryway board on pinterest!). Here is a sneak peak at what it now looks like:

When we moved in, our entryway was looking pretty rough. There was worn down wood paneling on the floor that may have once been intended to be on wall, it was hard to tell. The coat closet was as it is today, minus the coat of white paint, and the other closet was wall to wall wood plank shelves with stains and lots of dust bunnies. It was rather disgusting! Sorry I don't have any pictures of it in its glory :(

Before we moved in we cleaned off all the surfaces and gave everything a coat of kilz primer. We ripped up the floor boards/paneling, and even put a coat of primer down on the floor to cover the patchy stained plywood. We put a length of indoor outdoor carpet down to catch some of the dirt that builds up in an entryway, and we moved in. Eventually I painted the walls the same tan color as the living room/dining room area, and we called it good enough. A month or so ago I rewired the front porch light, installing a timer switch so the light would turn on and off automatically. That is when this picture was taken, where you can sort of see the mess to the right on the shelves.

The thing was, the deep (double planked) shelves were great at catching stuff. All sorts of stuff. Miscelanous stuff. Stuff on its way into the house. Stuff on its way out of the house. Stuff I didn't even know was in the house. Stuff I didn't want in the house. Stuff I was looking for and could never find. You know how those spots work... Or don't work...

So a couple weeks ago I got sick of it, and was dreaming of the day we could tear both closets out and put in some builtin locker-type units like I've been pinning. I suddenly realized that by taking out the outer plank of wood from each of the shelves, that I could use some recycled cardboard boxes to get the same effect, albeit not nearly as nice looking. And so that's what I did, and boy does it ever make the space work so much better for us! Sure it isn't pretty, but it is functioning, and sometimes that is much more important. Also, now we can have one (or maybe two) chairs in that spot, so that we can sit down to put on or take off our shoes, which is great for guests with limited mobility. I can also sit Little M on it to put her shoes on, so I don't have to bend all the way over! Isn't it crazy how such a small thing (like a chair or cardboard boxes) makes such a big difference?

I figure that eventually we will get real boxes or bins or some sort, or at least paint or paper over the cardboard we have now, but since right now I am still shifting things around in the house so that the important mudroom/entryway-type things are actually in boxes there, I figure I'll wait a bit longer until the system gets a bit more like perfect :) I also don't know that I want to spend money on bins or boxes until we know what sizes are needed once we rip the closets out and put in a new system in there. So perhaps cardboard boxes it will be! I know it doesn't look pretty, but right now for us that is just fine.

Friday, July 22, 2011

Unexpected garden & rabbit inspiration

Last night we had a work-related get together. I work in an office building that houses people from multiple different agencies/groups. We interact professionally weekly or monthly, and of course chitchat in the office, but we don't hang out en mass very often - likely twice a year or so. So it had been awhile since we had all gotten together.

Our potluck/BBQ last night was at one of the guy's houses. I hadn't been to his place before, although I knew about where it was, and loved some of the other homes in that area. They have great views to the east across the valley, but are in denser woods than I like, and the lots aren't as big or distant from adjacent lots as I would like. That being said, the house we were at was amazing! My office mate's wife is an artist, and their home has so many artistic and thoughtful touches! I wanted to take hundreds of pictures to capture all of the great ideas they had made use of, and to share with you all, but I didn't. Instead I ran around after Little M, who had a blast playing 'fetch' with one of my other co-workers' dogs.

Then there was their garden! They had such vigorous and healthy plants, I was amazed. We asked for (and got) a garden tour, which are always so informative & fun. They keep chickens and rabbits, and apparently rabbit poo is amazing compost, and it isn't 'hot' like the poo from many other animals, so they can apply it directly. Learn something new every day!

I'd thought about raising rabbits before (my parents did for years but before I was born), but not all that seriously. But amazing compost + home-grown meat? Uh, yes please! When I got home I talked to my husband (who had to work and wasn't able to come to the get together) about the rabbits (and the amazing house!) and he was into it! So maybe some time in the future we will raise rabbits for meat :) Anyone else interested in raising rabbits for meat & compost? Anyone raise them now? I can't wait to learn more, maybe this winter I'll research rabbits :)

It was a perfect evening after the rather stressful week I've been having (mostly due to my own lack of time to plan in advance), unexpected and wonderful and full of great surprises :) Have a great weekend!

Wednesday, July 20, 2011

Being a working mama - finding balance

I'm a working mama. I'm very lucky in that my current job doesn't have set hours, and there is never any obligation (other than meetings or field days that are scheduled in advance for the most part) to go in any certain time or any certain day. However, we do have this crazy goal to pay our house off in the next 5 years, so I try to work a certain number of hours a month so that my paycheck is a certain amount so that we can meet this crazy goal, which basically means I work full time, although we aren't talking 40+ hours a week in the office, its more like 30-35!

But it's a balancing act. I don't want my daughter (Little M) to be in daycare every day. I am the main homemaker in our family, although I don't make supper every night (my husband makes supper on the 3 nights a week when he doesn't work), and my husband helps me out by helping put away clean clothes, care for the dogs, keep the lawn mowed and watered. I still end up doing the majority of work around the house, taking Little M to daycare 2-3 days a week, keeping the fridge & pantry stocked, and all those other little cleaning & organizing tasks that keep a home running.

Back when Little M was born, she came with me to work every day, and I worked much shorter days (more like 20-25 hours a week). But we didn't have our budget as nicely set as we do now, and while we wanted to pay the house off within the 7 year window from when we bought it that our seller contract allowed, we didn't have a plan set up to do that. As she got older, more active, and awake more during the day she started staying home with my husband during the week during his off days (at that point his work shifts were Fri - Mon so he was home with her Tues - Thurs). And at about 6-8 months she started going 2 days a week to a wonderful in-home daycare just minutes down the road.

As she got older and her afternoon naps got more defined, her daycare days ended up being my longest work days, as we got there around 9 (sometimes 8, sometimes 10 depending on my morning work obligations and goals), but she would nap until just after 4! That makes for a long day for this mama! While Little M is doing much better during the night, on her best nights she wakes up once to nurse, and on her worst it is every two hours. For me, I find it very challenging to be a good, present mom when I get home with her at about 5, have to cook and serve dinner, let the dogs out, and deal with a missing-her-mama little girl until bedtime around 7:30.

More recently, my husband's job situation has shifted around, and his days off seem to keep changing. This has made it challenging to arrange daycare while not making our great daycare provider constantly shift her days around (we have certain days of the week that are ours, and when we need different days, unless the other parents can switch their requirements, we are out of luck). Luckily we were able to switch our Friday to Thursday, although it likely will be the only time until Little M turns 2 that we will be able to switch days. That meant that I stayed home with her, first on Tuesdays, and then when my husbands shifts switched again, I stayed home with her on Wednesdays.

At first, it was great staying home with her one day a week, but then we realized that in order for me to get enough hours in each week (and not have 4 too-long days), I needed to work a couple hours from home on the weekend, and a couple hours while she napped during our day at home during the week. And then it all sort of fell apart. I didn't have down time then while she napped to get the other things done that I needed and wanted to do. I constantly felt overworked and stressed and behind on things, and it was a struggle to find things that I could bring home with me to work on.

But I really enjoyed having that day off with her, to focus on her, and get a bit ahead on housekeeping and meal planning. And sometimes we would go into town and meet with other moms, and that was really great. And just about when I was deciding that we needed to revisit the budget and revise our payoff schedule with the house so that I could get away with working a few hours a week less, our daycare provider mentioned that we could come on Wednesdays as she now had them free.

Huh. Well it was a hard decision. I ended up, for the sake of continuing to meet our financial goals, to decide to send her an additional day, so 3 days a week. That would mean I would have to work more hours to pay for the additional daycare costs, and have 3 days of the week where I had to get home from work & picking her up later that I would like, scramble to get supper on the table & dogs fed & exercised, and find energy to play with her before bedtime.

I'm still trying to find the balance in this new schedule. I'm not sure that I will find it; next month we may revisit things and decide to change our goals, or hope that in the next 5 years we start bringing in more money each month to let us catch up from me staying with her one day a week. And who knows what the future will bring to each of our current jobs. Its been hard to balance our goals of having our daughter grow up with (mostly) us around, with our goals of paying the house off so soon. But we both realize that paying the house off a bit later is worth it to enjoy these moments when she is so young. We just have to decide what the right balance is for us :) And the great thing about all of this is it means that my husband and I are continually checking in on our conversation about what is best for us as a family and her as our child, and making sure we are headed in the right direction and making the right choices for us.

Monday, July 18, 2011

Choosing chicken breeds

I thought I would give you all a little insight today into the laying chicken breeds we got last week and why we chose them. I haven't done all that much research on any of them, instead  figuring that if I picked ones that others around here had, and ones that seemed like they would meet our requirements, I would end up with a couple breeds that really worked well here with us. I'll go through each of the 8 breeds we now have, and for those of you who missed my anticipating chicks post & my excited post once they were here last week check those out for more pictures and details!

One of the main things I was looking for was the ability to withstand cold (down to -30) temperatures in the winter, and hot (up to 100) temperatures in the summer. Because of this, I chose not to get the flashier breeds. We were also looking for birds that were able to forage, were friendly, and were good layers, and weren't too flashy/pale colored to avoid attracting predators. I also tried to pick dual-purpose breeds so that if 16 turned out to be too many, we could eat the extras!


Of our order of 25 chicks, 9 were meat chicks which we will slaughter & freeze sometime this fall when they are big enough, and the remaining 16 were 2 each of the following 8 breeds:

  • ameraucana
  • ancona
  • barred rock
  • black australorp
  • buff orpington
  • rhode island red
  • silver laced wyandotte
  • speckled sussex
Ameraucana: These are supposed to be very hardy, and especially cold tolerant. They can be broody, and the are supposed to be fairly tame. The top photo shows my fluffy cheeked little gal, who is pretty curious and friendly. The second girl looks kind of sleepy and shy, but is fairly skittish. These two had me guessing, they look really similar to the two speckled sussex (who are identical to each other), but not as alike to each other.


Ancona: These two girls are my favorite so far. They will end up being smaller than the others, and I don't know how hardy they will be. But they are really active, and should be good foragers and avoid predators. They are also the only breed I got that lays white eggs, which my husband requested. I figure on a day or so should do him, right? :) These are also one of the breeds that just really attracted me, I'm not sure why! I think I liked their foraging ability and their looks. We'll see how they do!


Barred Rock: These are supposed to be a very quiet bird, and so far, I really agree! My two girls are very docile and calm when I pick them up. And they also don't seem to care when I am moving around beside them in the coop, unlike some of the other breeds. They are supposed to be good foragers too, and from what I have seen of them going after little grasshoppers, I would agree with that too! We'll see how well they do in the heat & in the cold, but others in this area have them too, so my girls should do fine.

Black Australorp: These ladies have seemed pretty skittish for me so far. They are supposed to be cold hardy though, and good foragers, so hopefully they will do well here.


Buff Orpington: These are supposed to be a quiet bird, cold hardy, and they can be broody. My two girls seem pretty alert and not easily panicked. I know they can be hardy around here, but their light color has me a bit concerned about predators.

Rhode Island Red:
These have good egg-laying abilities and are considered hardy, and seem to do well in our area judging by other people around who have them. My two are rather skittish so far, but hopefully with more handling and exposure to me they will get better.

Silver Laced Wyandotte:  These should be cold tolerant and may be broody. I think the chicks are very pretty, and the adult pictures I have seen are also beautiful. My girls are fairly active, not staying still long, and not liking to be close to me.

Speckled Sussex: These are supposed to be calm and cold tolerant. My two don't seem very interested in getting close to me though! They are very pretty though, and they both look identical! I love the feathers that are coming in on their wings, they are going to be beautiful adults.


The consistent thing I looked for was hardiness. I'm just hoping that these birds will mostly be able to make it through our cold winters and hot dry summers. I would really like to end up with a couple breeds, or even one, that really work well for us. Longer term, if having layers works out and we enjoy having them, I think it would be really great to have just one or two breeds and have roosters also, so that we can incubate our own chicks, perhaps even to the point of selling chicks! We'll see though, it might be more work than we can handle!

I'm joining up to the Homestead Barn hop today, so hop on over to check out the goings-on on other homesteads all over the country!

Friday, July 15, 2011

Clever use of space on the boat

I'm giving you all a break from hearing about my new chicks to share some space saving solutions that I experienced while on my in-law's boat in Alaska last month. Don't worry, the chicks are all doing great and are now out in the chicken coop (they were stinking up my front hall!) enjoying more space and some ants!

So we were on a 42 foot Grand Banks for 2.5 weeks in the end of June. As you can see below, the outside of the boat has a fly deck on the very top where you can drive the boat from outside, and a deck around the entire main level including a low wide back deck.The boat has 2 sleeping rooms, 2 bathrooms, and one main cabin area with a table, 2 chairs, a bench along the wall, a kitchen space, and a high bench seat by the wheel.


You can see the deck was fairly narrow, with a low full railing and a higher wire railing. We were pretty careful when Little M was walking around the deck. She always had her life jacket on her, and she also always had one of us right with her to grab the handy loop at the top of her life jacket in case she decided to look overboard. We didn't have any close calls with her on the trip, which was great!


 The fly deck, the wheel you can just see a curve of below Little M's toes.


Looking forward from the table area, the kitchen is to your left in the photo, my husband is driving the boat at the inside wheel. In front of him there were about 4 different storage areas under the surface that the computer is sitting on. They stored everything there from can openers (to the left by the microwave), to pencils (in a small compartment under the computer at the front), to maps and papers.


This view looks from the table area towards the front of the boat again, but towards the kitchen. behind my husband you can see the short door that leads down to the V berth where we slept. There is a short little fridge and freezer in there, a gas powered 3 burner stove top and oven, and a sink that was big enough for Little M to have a bath in :)


This view looks from behind the kitchen area towards the side of the boat. You can see the L shapes bench and a bit of the folding table. The table was really neat, it had to long sides that folded down, and a narrow middle strip that stayed put. When the sides were up there was plenty of space for all 6 of us to eat meals, but when they were down you could walk between the tables edge and the bench.


This is the V berth where we slept for the trip, me a little curled up to avoid kicking Little M's head - see her there taking a nap? You can also see the little hammock strung to the right for gear. These are your typical kids stuffed animal hammocks, used here to stash anything and everything! We kept our rain gear (when it was dry), the Ergo carrier, Little M's warm outside clothes, and there were some spare blankets too. You can see the bottom of the little bookshelf on the wall at the top of the picture, which they were using for movie storage (there is a TV and DVD player in the captains room apparently) but we put a couple of Little M's books and a field guide up there too during our stay on the boat. One of the bathrooms was down here - very simple, a one stall shower with a toilet and sink in it.


Here you can see the back of the boat - see the dungy and the one kayak stacked up? The kayak I was in to take this picture gets stowed on top of the other 2 boats. Up on the fly deck at the very top, they had a number of waterproof type bins with secure lids where they stored other items - extra food, parts for the dingy and kayaks, etc. Under the cover in the fly deck is where we stowed Little M's car seat while we were on board. It was wrapped in the plastic bag from the airline and stayed protected and dry there. The cat litter box was also up in that area, as was more storage for non-perishable items.


This is the neat pulley system they have for getting the dingy and the larger of the 2 kayaks up on top of the boat. It makes it easy to move the heavier items up out of the water and onto the top of the captains berth area.

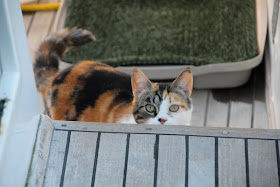
You may have noticed the small dog they had on the boat - Cocola. They also had one of their two cats on board with them - Honda. Here she is below. Behind her you can also see the fake grass area for the dog to do her business. Clever idea to allow the dog to be with them for the months they are on board!


What I really liked was all the built in custom storage. The boat had everything from those compartments in the front by the wheel and computer, to dresser drawers of different depths according to the boats exterior hull under our beds (deeper high ones, shallower low ones). There was even a small compartment in the table surface that could hold placemats. It was so impressive to see how much function (and stuff!) could be fit into such a small tight space on the boat, and it really made me certain we could do more with the spaces we have in our home. I'm now finding myself imagining builtins everywhere around our house! I'm sure they wouldn't have quite the same charm though :)

Thursday, July 14, 2011

Chicken update - they're here!

So yesterday morning I didn't think there was much chance of the chicks arriving, but when I was out with the dogs I figured it wouldn't hurt to go across to the coop and get the food in the feeder and put water in the waterer.  When I got back in, there was a missed call on my phone & a message from the post office saying my chicks were in!

I had talked with the lady at the post office Monday morning warning her that I had chicks coming in the next couple days, and then yesterday I went across (I work literally right across from the post office, so it's just across the crosswalk and there I am) and I checked in with her again to make sure they weren't waiting there for me. It was nice to get the call this morning though so I knew that I would be going in to work briefly then back home again for a bit to get them set up!

When I brought them in to my office, all were looking good apart from one dead meat chick & one other meat chick that was looking a little peaked. That one ended up dying during the day yesterday, and by evening there was one more looking like it wouldn't make it that died overnight. Not bad to loose 3 of 26 and have all 3 that didn't make it be the meat chickens that I'm less concerned about (they sent an extra meat chick, at least I'm assuming the solid light yellow ones are all broilers!).


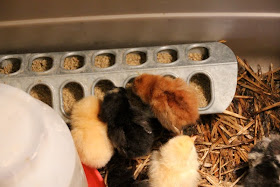
The rest are all doing great, and they are so cute! At the moment I've got them set up in rubbermaid bins in the front hallway. I know, I had the coop all ready for them, but I just couldn't resist keeping them closer to me for the first couple days so that I can keep a closer eye on them, handle the layers a bit more often, and just listen to their cheerful chirping!


I have the littler ones separated from the larger gals. So that's the meat chicks, both anconas, and the smaller of the barred rocks in one container (the one with lots of yellow chicks), they are all smaller and seem a bit less active. The other barred rock, black australorps, buff orpintons, rhode island reds, silver laced wyandottes, ameraucanas, and speckled sussexs are in the other (with larger looking & darker chicks).

When I get better pictures of the little chicks, I'm hoping to put together a post on why I chose these 8 breeds, and I'll include pictures of each of them. Although already last night my husband asked what I was doing taking so many pictures, in a row, of the same thing... Guess I'll have to wait until he's at work on the weekend :)

Do you have any new additions to your household lately? Are you taking a ridiculous number of pictures of them too?