Showing posts with label organizing. Show all posts

Tuesday, February 26, 2013

Small additions can be great - the sofa table edition

You might have noticed something different if you were very familiar with my main living/dining room and were looking at the picture of the hoya plant in my weekend in pictures post from a few weeks back.

Over the last year I've been dreaming of having a sofa table for storing kid toys, games, and books to go behind the couch in the living room part of the main room. Behind the couch is where we had been keeping Little M's toy bucket, filled with whatever selection of toys we currently had out for her, be it Lego's, doll & dress up clothes, or one of 2 selections of assorted small toys. Our area rug was back there, and we sometimes also had a rocking chair against the wall too. The plan for the area was for it to be a sort of kid-zone, where she was able to ignore the TV since the couch was in the way, and be in a more central location - close to the kitchen, dining room table, and couch. It was working quite well, although often we would have the toy bucket plus several of the storage bins of toys from the hallway, plus a bunch of stuffed animals from her room, plus... You get the picture.
Ahem, this dirty carpet? the result of the Christmas tree falling over twice in the course of an afternoon... christmas tree fail!

Clean up time ended up being more about moving bins back to their hallway or bedroom destinations than about actually cleaning or sorting toys. I was getting sick of hauling bins around, and thought it would be great to have a shelving unit of some sort so that her area could be even more her area. And also so the hallway closet could be devoted to storing other things (like all of the office stuff that used to be in the spare-room-to-be-turned-Little-M-big-girl-room!).

So I put an ikea sofa table on my christmas wish list, and as Christmas Day rolled around, I was rather overly excited to discover that my mother-in-law had happily obliged! After a bit of trouble shooting to get it fitted into our Escape along with our 3 dogs including 2 set up kennels and 1 collapsed kennel, the 3 of us humans, and all of our weekend away gear (plus presents!), I managed to convince everything to just fit in the gosh darn vehicle for me. Yes, there was some creating packing, and our half-way-home pit stop entailed a little bit of manuvering to get access to Little M's potty seat, but we managed to fit everything in, and got the ikea boxes home.

I quickly fell to setting the sofa table up (well, after unpacking the Escape and putting most of the Christmas stuff away), and put it in place. While I was amazed at how much stuff I could fit in it, I was a little dismayed that there was really only room for Little M's toys - more of a quantity of toys issue than a sofa table space issue methinks! It actually worked out well to just have her toys in it, as it made the space much more clearly the kid-zone as opposed to a shared space for some of my puzzles and books as well.

With the addition of the play kitchen (yes, still not quite finished!), my favorite bouncy chair, and Little M's bookshelf, the whole space turned into a great little play and reading area. I'm really happy with the additional space in the hallway closet & in Little M's bedroom shelves, and with not having to lug storage tubs back and forth every couple of days! This way, she can get the bins out on her own, and put them away on her own too - she's becoming quite the tidy-er :) Because of the life season we are in right now, you can see I really don't worry about having everything tucked away just so - the books are rarely staged-photo-worthy, neither are the bins, but just having spots to tuck all of those items away makes the whole area look much more structured & neat I think!

I also love how we've been able to incorporate reading into her daily routine so much easier with the bookshelf right there. before, she occasionally would sit in her room and read books on her bed, but now I quite often find her with a huge pile of books around her, just sitting and 'reading' the perfect selection happily by herself. Not to mention it is a great spot for her and I to sit while reading our bedtime stories!

To cap it off, I'm really pleased with how a relatively small addition has added so much function and purpose to our space! I thought about building my own version of the ikea table, but looking at the progress I've made on the play kitchen past the 'just get it functional' stage, I'm glad I have only 1 rather unfinished piece in the room not two! Ahem, not to mention the lack of window trim, etc - but I love our home, unfinished as it always is!

Wednesday, August 17, 2011

Closet organizing at Grammy's house

Last weekend, and the weekend 2 weeks before that, was spent at my mother-in-law's house outside of Spokane. She lives on a lake, so we had a lot of fun playing on the beach, walking the boardwalk along the lake, and playing in the water. Little M had fun with her Grammy, and I had fun organizing the closet in Grammy's spare room! It was basically a win-win-win-win situation. I knew Little M was being well taken care of & loved on (and spoiled!) by Grammy (and G-daddy as her husband likes to be called!), I got a good break from her while being able to do one of my favorite things - organize, and Grammy of course got quality time with her granddaughter!


So back to the closet. Grammy's house is a two level home with a two bedroom main floor with an open floor plan living space & kitchen, and a walkout basement that is rented out as an apartment right now, so her space is limited to the upstairs. When her husband retires (he still lives over on the west side in the home my husband grew up) and moves over to live there too, the renter will go and they will do some renovating to have full use of the downstairs as well. For now though, her space is a bit tight for all of the stuff she has.

You see, she buys things at yard sales or thrift stores for cheap, and then sells them on eBay. She does really well since she is great at spotting salable items! Last year she started buying Halloween costumes when she saw good quality ones for cheap throughout the year, and then she sold them online before Halloween. She quickly realized it was well worth buying them up and storing them. But that meant she had even more things to store around her house, and this year the bins of costumes were taking over!

So that is how I came to be organizing her closet. The spare bedroom has a nice sized closet, but it was full (literally) to the brim with quilting supplies in boxes and bins and bags. It was quite a mess, and as Grammy had just retired and is now hoping to do more quilting, we thought having the quilting fabrics more accessible and less of a mess would help her be better able to relax and quilt! So we decided that the quilting supplies would be moved out of the closet, likely to end up in a storage system like an Ikea Expedit bookshelf system, or something similar.

I realized that I forgot to take a true before picture of all the quilting supplies in the closet, and of the bins and bins of costumes (bad blogger!). But here is the stack of quilting supplies after we took almost everything out of the closet (and when I remembered to take a photo), and below that is what was still in the closet when I remembered. That tower with drawers below was in the closet too. Yup, that closet was literally packed full!


That left the closet empty to fill with all those Halloween costumes! Although Grammy claims that she really doesn't need to easily see the stuff she sells online, since once she brings it home she takes a photo of it to list it with, and then until it sells she just needs it stored someplace, I thought that by having the costumes sorted she wouldn't have to dig through multiple bins to find the specific one she was looking to package up and mail out. So that led us to design a closet with multiple levels of rods for hanging costumes, along with some shelves for storing those miscellaneous costume accessories like wigs, witch hats, and crowns.

We ended up picking up a system at Home Depot that she can rearrange if in the future she stops selling Halloween costumes and decides she wants something else in that closet. It was fairly easy to install and now can be adjusted in minutes if she decides she wants a rod higher or lower, or wants to add a shelf. Here is the closet all empty and waiting to be filled with costumes!


And here it is again once we packed all those costumes in there! Great, right?! I think Grammy was pleased that we did all this organizing, and hopefully she lets me come back and visit again :)

Wednesday, July 27, 2011

Easy memo board rehanging

My husband and I have had this memo magnetic whiteboard basically since we started dating. Initially it hung at his house in the bedroom and we would keep notes on it, pictures, tallies, or to-do lists. It was initially hung with double sided sticky foam on all 4 corners. It stayed in that same spot until after I moved in with him, although it was removed once or twice for painting projects in the room. I think the first time it came off the wall it took some paint and perhaps even some of the drywall coating with it, which didn't make me happy, and obviously the stickiness of several of the foam pads was seriously reduced. After that it likely fell off the wall a couple times, and so when we moved into our current house it never got put back up on the wall.
 Instead for the past 2 years it has floated around, sometimes being used, sometimes being stuffed into a closet somewhere. It always annoyed me when it was floating around on the table, or in the entry way on a shelf, because it took up space and just looked sort of junky since it definitely didn't belong there. So last weekend (after it had been brought back out and was being used for to-do lists again while surfing around the table) I decided to do something permanent about it.

First I tried to use some string or elastics pinned to the back of the board, and then thumb tacked to the wall. Didn't work. So then I got more creative and went looking for something sturdier. I was initially thinking plain paper clips, but all I could find was those larger paper clips, alligator clips I think they are called. I cut one in half, bent it around to the shape I was looking for, and used epoxy glue to glue the clips onto the back of the board.


Then I waited for a couple of hours to let the glue set, and I hung it on the wall with thumb tacks spaced so that I could wedge markers up there. Perfect! Now I have a easily modifiable and visible to do list for myself where I can also put important notes up where my husband can see them too! Now I just have to get him to keep an eye on the board for those important notes...

It was simple and easy, and I'm amazed that I put off doing something like this for so long, because it makes my life so much easier, and my table so much cleaner!

Friday, July 15, 2011

Clever use of space on the boat

I'm giving you all a break from hearing about my new chicks to share some space saving solutions that I experienced while on my in-law's boat in Alaska last month. Don't worry, the chicks are all doing great and are now out in the chicken coop (they were stinking up my front hall!) enjoying more space and some ants!

So we were on a 42 foot Grand Banks for 2.5 weeks in the end of June. As you can see below, the outside of the boat has a fly deck on the very top where you can drive the boat from outside, and a deck around the entire main level including a low wide back deck.The boat has 2 sleeping rooms, 2 bathrooms, and one main cabin area with a table, 2 chairs, a bench along the wall, a kitchen space, and a high bench seat by the wheel.


You can see the deck was fairly narrow, with a low full railing and a higher wire railing. We were pretty careful when Little M was walking around the deck. She always had her life jacket on her, and she also always had one of us right with her to grab the handy loop at the top of her life jacket in case she decided to look overboard. We didn't have any close calls with her on the trip, which was great!


 The fly deck, the wheel you can just see a curve of below Little M's toes.


Looking forward from the table area, the kitchen is to your left in the photo, my husband is driving the boat at the inside wheel. In front of him there were about 4 different storage areas under the surface that the computer is sitting on. They stored everything there from can openers (to the left by the microwave), to pencils (in a small compartment under the computer at the front), to maps and papers.


This view looks from the table area towards the front of the boat again, but towards the kitchen. behind my husband you can see the short door that leads down to the V berth where we slept. There is a short little fridge and freezer in there, a gas powered 3 burner stove top and oven, and a sink that was big enough for Little M to have a bath in :)


This view looks from behind the kitchen area towards the side of the boat. You can see the L shapes bench and a bit of the folding table. The table was really neat, it had to long sides that folded down, and a narrow middle strip that stayed put. When the sides were up there was plenty of space for all 6 of us to eat meals, but when they were down you could walk between the tables edge and the bench.


This is the V berth where we slept for the trip, me a little curled up to avoid kicking Little M's head - see her there taking a nap? You can also see the little hammock strung to the right for gear. These are your typical kids stuffed animal hammocks, used here to stash anything and everything! We kept our rain gear (when it was dry), the Ergo carrier, Little M's warm outside clothes, and there were some spare blankets too. You can see the bottom of the little bookshelf on the wall at the top of the picture, which they were using for movie storage (there is a TV and DVD player in the captains room apparently) but we put a couple of Little M's books and a field guide up there too during our stay on the boat. One of the bathrooms was down here - very simple, a one stall shower with a toilet and sink in it.


Here you can see the back of the boat - see the dungy and the one kayak stacked up? The kayak I was in to take this picture gets stowed on top of the other 2 boats. Up on the fly deck at the very top, they had a number of waterproof type bins with secure lids where they stored other items - extra food, parts for the dingy and kayaks, etc. Under the cover in the fly deck is where we stowed Little M's car seat while we were on board. It was wrapped in the plastic bag from the airline and stayed protected and dry there. The cat litter box was also up in that area, as was more storage for non-perishable items.


This is the neat pulley system they have for getting the dingy and the larger of the 2 kayaks up on top of the boat. It makes it easy to move the heavier items up out of the water and onto the top of the captains berth area.

You may have noticed the small dog they had on the boat - Cocola. They also had one of their two cats on board with them - Honda. Here she is below. Behind her you can also see the fake grass area for the dog to do her business. Clever idea to allow the dog to be with them for the months they are on board!


What I really liked was all the built in custom storage. The boat had everything from those compartments in the front by the wheel and computer, to dresser drawers of different depths according to the boats exterior hull under our beds (deeper high ones, shallower low ones). There was even a small compartment in the table surface that could hold placemats. It was so impressive to see how much function (and stuff!) could be fit into such a small tight space on the boat, and it really made me certain we could do more with the spaces we have in our home. I'm now finding myself imagining builtins everywhere around our house! I'm sure they wouldn't have quite the same charm though :)

Monday, May 2, 2011

Little M's Nursery

Today I'm writing a post to link up to HOUSEography's house tour. This week is all about touring through kid's rooms, so I'll be sharing pictures of Little M's nursery! I don't have many before pictures, since my hard drive crashed and I lost a couple months of pictures dated right around the time we moved in here, but let's picture a room with gross dusty dirty pet-stained carpets originally a tan/beige color. The walls were a neutral tan also. It was pretty blah!

Here is an early picture when we were still in the process of putting the wood floors down and moving furniture from our old house into this one. This room the second one to get flooring, so it was the catch all for bins and books and things that didn't yet have a place to go. The room is painted & the new floors are in, but notice the old metal framed slider windows, and the lack of baseboard & some window trim.
At the time, we knew Little M was on her way, so we picked a pretty light blue for the room, although once the floors were in I wished we had picked a slightly different shade to match the reddish color of the floors better! However now that her room is more set up it isn't as noticeable :)

Here is the current room, it isn't as finished as I would like - the trim still isn't up and I need to figure something other than a blanket out as curtains!  I also want to make a mobile and put more art on the walls. But we've put a bit of art up, replaced the window so it stays warmer in the winter and cooler in the summer, and we've moved most of the non-kid related stuff into other spots in the house (like when I moved my desk into the closet of the guest bedroom). Here are a bunch of pictures touring through Little M's nursery, I hope you enjoy them!
The wooden wall hangings were baby shower gifts from my husband's little sister who lives in Hawaii.
This corner is where we read stories and where I nurse Little M. This picture shows the wall color the most accurately. The wall to the right of the flowers is where I want to hang some art. Still need to figure out exactly what I want to go there, and make it!
The large clothespins on the wall hold cute memories - some of the flowers we received at the hospital after Little M was born, and a beautiful dress made for Little M by the sister of one of my co-workers. The closet is a bit of a mess, oh, and it really needs some doors! I've been wanting to build a built-in shelf/box system for the closet, but it just hasn't been high enough on the priority list to get done. I suppose I could at least measure and design it, maybe in the summer when it gets too hot to be outside.
I spent some time organizing all her books by color, which I've been meaning to do for quite some time. I think it looks nice like that.
The pink and black quilt was made by some of our local friends; it's absolutely beautiful. They found police vehicle fabric (my husband works in law enforcement), and on the other side there are wild stallions (cause we live in the wild west, you know!).
Above is a close up of the quilt so you can really see how beautiful it is!

I couldn't resist adding this picture, I was trying to tidy up her room to take pictures, and she wanted to 'help' me. She was content to sit on the chair and play up there with an assortment of the blankets, toys, and books that I was trying to tidy! (Oh, and the multicolored blanket she is snuggling under was knitted for her by my mom!)

I hope you liked the tour of Little M's nursery! If you want to see more people's nurseries, head on over to houseography

Friday, April 8, 2011

Bathroom Cupboard - Hot Spot #5

Well at first, when Tsh announced that the final Hot Spot in her 5 weeks of organizing was the hot spot of our choice, I felt a little let down. Wait, I thought, that means I need to pick an area on my own! Then I realized that with my hectic life these last few weeks, that would work really well - I could pick a cluttered spot around my house that is just the right size of project for me to accomplish in the amount of time I have - perfect!

First I thought I would do the kitchen/dining room table. But then I realized that I could simplify it twice a day and things would still end up there - and that's ok for this point in our lives. Then I thought I could do the front hallway/entryway. But I realized that to really make that better would require some restructuring of how we store things in other areas of our house - and I definitely don't have time for that. So then I thought of the bathroom - although I have sorted and purged things from the wall cabinet above the sink, the cupboard under the sink hasn't been touched in months at least, if not almost a year. Ahah - perfect! Here's my before picture:
First I pulled everything out onto the bathroom floor. First to go were the assorted screws and old toilet parts - either to the garbage or to the front hallway where we store our tools and spare parts. Next I sorted through our cream, soap, and shampoo bottles and tossed the empty ones and the ones that haven't been used in years. Several items went into the wall cabinet above the sink, and several more were tossed. Then I put the keepers back in, arranging bottles, boxes & toilet paper rolls to make everything look nice. Here's my after picture:
Head on over to SimpleMom to see what everyone else has simplified this week!

Friday, April 1, 2011

Pantry & Fridge - Hot Spot #4

Well, after skipping Hot Spot #3 last week, I figured I had better put my best foot forward and make a real effort with this week's hot spot. In the past week we have some home stuff that has kept my husband and I busy with some planning and strategizing, and occupied me later in the week when I would normally have been working on house cleaning and blog posts - hence my lack of a post on or progress for Little M's clothes & toys which was last week's hot spot.

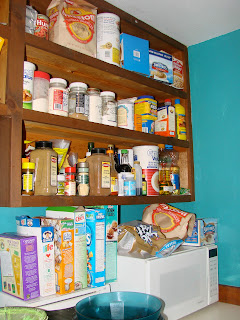
This week's hot spot is the pantry & fridge. These are 2 areas that although I try to keep simple, and take action on every couple of weeks, they are always getting cluttered and definitely needed some attention this week! Here are my before pictures of my pantry areas & fridge (ignore the patchy paint & uncovered electrical outlets, I'm mid-project and still need to do the second coat!)


I basically just shifted things around and organized, but it was amazing how much more space I ended up with! I threw some things out, but the space they were taking up was definitely less than the free space I ended up with. Here are the after pictures:


Head on over to check out everyone else pictures at SimpleMom!
Related Posts Plugin for WordPress, Blogger...