Tuesday, March 29, 2011

Gardening in March in years to come?

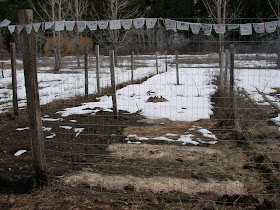
Where our veggie garden is right now, it doesn't get direct sun during the heart of the winter. This means that come this time of the year, when other locals are starting to work in their gardens, I am left staring at a pile of slowly diminishing snow...
this was monday afternoon - sunday all of this was still snow covered
However, if I had raised beds near the orchard, house, & chicken coop, I could be gardening right now!
this area has been snow-free for days and days!
When we first started working on the garden, the old renters hadn't yet moved out, and our purchase of the property wasn't yet final. We picked a spot in what we now call the middle field, where a garden had once existed (based on the bare ground at the spot).
summer of 2009, pulling weeds where our garden is now
This spot is a fair ways from the house though, and its lower elevation and closer situation to the hills that block the winter sun make it less ideal than we would have chosen not that we had that much of a choice at the time.
summer of 2010, looking at the house from the garden
Now that we have put so much work the last 2 years into getting the garden going, I am reluctant to give up on the spot, but I am definitely thinking hard about adding raised bed near the chicken coop! Especially since we plan to build a playstructure for Little M near there, so I could garden while she played...

Monday, March 28, 2011

Burning weeds

We have a lot of weeds on our property, some are considered 'noxious', some are just plain old weeds. In the past week we have been raking and burning these weeds as the snow melts and leaves them bare. This evening my husband did a whole area that I completely gave up on mowing last year.
The human-propelled push mower that was great on our old urban postage stamp lot made it hard for us to keep up with the grass (weeds) at our new place. The first summer when we moved in, the weeds had already gotten the best of us - they were easily knee high, and already starting to die and dry out (and harden up!). After doing a lot, and I mean A LOT, of raking and burning last spring, we kept a pretty good handle on a large part of the 'lawn' around the house, but there were still fields that didn't get touched. The upper and lower side pasture, the middle field where my garden is, and the lower field where my husband kept his game garden. Not to mention the really bad area behind the garage...

This spring at some point we will try to get the ride on mower running, a friend of my husbands gave it to us last summer. It is likely older than I am, and although we can jump it and get it running, the power to the mower isn't working, so we need to get that fixed so we can keep ahead of the weeds this summer.

I'll be linking this post up to the Homestead Barn Hop! Hop on over there and check out all the goings on at homesteads all over the country :)

A family weekend

We had a busy weekend, even though the weather was a bit dreary - more rain mixed with snow! Today is gorgeous and sunny and it has inspired me to share our weekend with you. My husband was off work this weekend so we had a surprise weekend together! We rarely get weekends off together, and very infrequently when we are just staying home, so it was a real treat to spend the entire weekend spending time with our daughter and each other.

Saturday we went across to visit the Home Depot, the local garden show, and the nursery over there. We saw some spring flowers, ran into some friends, and even wound up heading up to Duck Camp. My husband's family owns 40 acres up on the reservation in the highlands, where they gather in the fall to hunt ducks. His family has been going up to that area since his father was young, so its a fond family tradition for him.

Because we live so close (45 minutes vs. the rest of his family at 3-5 hours away), we get to go there more regularly, and really like it up there in the spring. Little M loved playing in the dirt and twigs, and my husband cleared a tree that had fallen down over the road into camp. We saw some ducks and other wildlife, but I'll let my husband share those over on his outdoors blog. We're hoping to get across to camp over at Duck Camp for one or two nights in the near future, but I'm trying to hold off until its a bit warmer at night, and until Little M is sleeping better during the night! (nothing like waking up every 2 hours in a small enclosed tent, even to this bundle of cuteness...)

Sunday we had a lazy morning and then in the afternoon we finally finished pruning the fruit trees, and started clearing up all the cut branches. We scouted out some trees to cut down by the creek, to keep my husband busy today for firewood for next winter as well as to thin the area for fire protection. We live in a fire-based ecosystem after all! I remember the week we moved in there was a day where there were about 6 small wildfires burning around the house - none closer than a 1.5 mile, but all in our creek drainage or just over the rise into the next canyon. We were pretty quick in making sure we had insurance on the place, that's for sure!

I also got some more painting done in the kitchen (hopefully we will finish that project soon and I can share the bright new color we chose for in there, it looks so bold!). I meant to work more on the trim around the doorways (yup, still working on that project...) but I just didn't have time. I also meant to start some more seeds, but that didn't happen either! I guess it was just a 'working on ongoing projects' sort of weekend.

Thursday, March 24, 2011

'Spring' rains & snows = flower buds!

This past week or two we have been getting some weird weather. First it rains, then it changes to snow and starts sticking, then it stops and within a couple hours most of it is melted. Not too strange, but it's been doing it about every other day!

The bulb bed beside the pole carport is starting to warm up - the snow has gradually melted, and in the last few days I have been noticing little buds starting to poke up through the dirt. Last spring we had the wonderful surprise of old bulbs coming up that we didn't realize were there! It was so fun to guess at what they were, and what color the flowers would be when they opened. We ended up having a small clump of iris, several tulips, and some daffodils. I really wanted to plant some more crocus and my husband wanted more tulips, but we decided to wait since we didn't know what the plan was for that bed longer term.
The beautiful surprise daffodils!
We ended up buying some bulbs last fall when we found some on sale, but we didn't get around to planting them before it snowed. I forgot about them completely for most of the winter, but when I was sorting through my seeds from last year prior to ordering more, I found them and stuck them in the fridge! Right now the 3 boxes of tulips and daffodils are still in the fridge cooling off before we plant them in a few weeks.
The bulb boxes are near the right side of the picture, near the cheddar bunnies :)
There's nothing better than spring flowers!

Tuesday, March 22, 2011

Pruning our fruit trees

I'm joining up (a little late) to this week's Homestead Barn Hop to share what I've been learning this week about pruning old unkept fruit trees!

Last year we meant to prune our fruit trees, really we did! But with a baby who was only a couple months old, and me still recovering all my core strength after an unanticipated C-Section birth, pruning just didn't happen.

Since then, I've done a lot of reading online, printed off a bunch of info brochures, and talked to people I know who have fruit trees.

Some things I have learned that I'm trying to follow:

 - prune branches that head into the center of the tree
 - prune new branches that head straight up
 - prune branches that you can't possibly pick fruit from even when standing on your tallest ladder
 - prune branches that are too crowded
 - prune branches that are overtaking the next tree over's space

I'm also trying to prune our pie cherry tree way back to reduce the amount of fruit this year, because I don't want to spray for the cherry fruit flies that it is infested with. Doing some research online I learned that the fly larvae can only survive 2 years in the soil, and the adults can't reproduce unless they have cherry fruit to lay their eggs in. Last summer I picked and froze all of the cherries to kill the wormy larvae, but there were a lot of cherries! I figure with less cherries, less will go to waste.

Here are some pictures of the start of my pruning handiwork. So far I've really only finished the cherry tree, and done some preliminary work on the apricot and the pear:
cherry is back left, pear front middle, apricot back middle

cherry tree is front center, apricot next back on the left, pear on the right

Monday, March 21, 2011

California trees in Washington

A bit over 2 years ago my husband (then boyfriend) and I went on an amazing road trip from our icy, snow-gripped mountain home to the southern deserts. We went through states that I had never been to previously - Utah, Nevada, California, Oregon.


The destination was Vegas, to celebrate my husband's youngest step-sister's 21st birthday. But the destination paled (especially for my rural woodsy taste) compared to the wild marvels we visited. We went to Zion National Park, and viewed an icy, desolate, barren, empty, park that few others see. We went to Yosemite and stayed in an incredible lodge nestled amongst huge old trees. We drove up the windy California coast and played on the beach in bare feet and t-shirts, after being in down jackets just that morning up in the mountains.
We brought back many intangible things -  lots of memories, inside jokes, and the surety that we could live with each other, but we also brought back 2 pine cones. One from a Sugar Pine, and the other from another California pine species that I have since forgotten.

I randomly planted seeds that I pulled from those cones, planted them in amongst my kitchen herb pots, in houseplant pots, in herb planters on the sunporch. And 2 years later, we have 3 little trees. 2 of one species, and one of the other. After many many months sharing space with other plants, we decided they needed to be repotted and separated.
2 pine seedlings & a straggly rosemary sharing space
Some day we hope to be able to plant these somewhere on the property, but in the interim, they will grow strong and tall on the sunporch in their planters.
a 3-stemmed pine seedling

Friday, March 18, 2011

Repotting my peppers

We made a trip across to Home Depot earlier this week and bought some exciting things (including some great paint!), and one of the things we picked up was some potting soil that was marked down. The soil was really for some tree re-potting that I will share with you later, but since I knew there would be lots extra, I figured my new starts could use an upgrade from their egg cartons to small pots so they had lots of room to grow good roots.

Last night after Little M went to bed and before Private Practice was on at its earlier-than-normal time (one of the few TV shows I love & watch consistently) I sat down on the sunporch and started playing in the dirt. I mean, I started re-potting my pepper seedlings. During a phone conversation with my mom earlier in the day, when I bragged about my cute little pepper seedlings, she mentioned to be careful not to let them get pot-bound at all, because apparently when pepper plants slow their growth down, it takes them a long time to ramp their growth back up.

I didn't think my seedlings were getting near the capacity of their little egg carton spots, but I figured I might as well transplant them into larger pots since I had some spare time and already had my potting stuff out. Well I tell you, I was pretty surprised when I popped one out to see that the main root was down hitting the bottom of the egg carton!

I transplanted 4 of my orange banana-type peppers last night and will do the chocolate bell peppers this weekend when they are all up, they are being a little slower at putting their heads towards the light so I'm going to let them get a little better established before I uproot them.

Even though the egg cartons weren't big enough to last for very long, I am loving how easy it is to pop the little plants out - I just stick my thumbs down below and pop them out:

Here is what the little pepper plants look like now - don't they look teensy & cute in those 'big' pots!

Thursday, March 17, 2011

Paper Clutter - Hot Spot #2

I've finished going through Project: Simplify's Hot Spot #2, Paper Clutter, which for me involved my desk in the closet of our guest bedroom.  I forgot to take a before picture (oops!) as I was so excited to be able to see my desk surface that I just dove right in and started making piles. But this pic shows pretty much the quantity of paper I had to go through - not too much.

I made a 'to be recycled' pile, a 'to be filed' pile, and a 'to deal with file'. Luckily when I moved my desk from the nursery into the guest bedroom about a month ago, I went through a ton of papers and so my piles weren't too bad.  I did manage to set some hanging files on the side of my desk up to help slow the paper pile build up in the future though - a 'current' folder for my current projects, and a 'to file' folder for when I don't have time to do more than move old bills to my desk.
I also tried to be better about dealing with the mail when it came into the house, hanging the bills to pay up on the fridge, opening and recycling any junk-type mail that comes in my husbands name (I rarely get junk mail addressed to me, and he rarely deals with his), and moving the newspapers immediately to the hearth for starting the fire in the mornings. I am going to really try to stop paper piles from starting so they don't get so overwhelming! Here are a couple of after pictures:

Tuesday, March 15, 2011

Sneaky little rodents...

About twice a year we get fed up with occasionally getting mice in the house and we carefully inspect the outside, looking at every possible way they could get in and making sure things are as closed off as they can be. We tend to come away from these inspections thinking that the house is secure, and we often figure the mouse must have gotten in through a poorly closed door.

In reality, I think that is rarely the case. There is a spot, somewhere, unknown to me, that mice are entering the house, those sneaky little rodents.

I think we are ramping up towards another house inspection, because this morning (while trying to get Little M back to sleep), we heard the telltale nibbling of a mouse. I think it was in the attic. So I set some traps in the sunporch, because they generally end up there next. Hopefully it won't sneak into the kitchen (through a hole I suspect exists behind the dishwasher).

Darn these older fixer upper houses! If only rodents weren't so important in the world...
A mouse trying to escape the dogs about a year ago - we all team up against them!
Luckily its warming up (likely why the mouse was out and about and decided to come sneaking into our house). Yesterday I heard robins around the house, and just a couple minutes ago one was on the wire right outside the window! Yay for spring being just around the corner! Its been raining heavily on and off for the past couple days, which is seriously melting our snow. I can't wait for spring flowers, the mud on the other hand, I could do without.
making an otherwise dreary morning more bearable :)

Friday, March 11, 2011

Cheap seed starting: egg cartons & a freezer

A bit over a week ago I was feeling a little cooped up in the house, and I decided that I would start some seeds. I began by getting some onion seeds ready to check their germination rates. I had previously cut up some old egg cartons into plant-specific groups and labeled them. The picture shows the cartons cut up for some of my peppers and tomatoes.
Then I put some dirt in old egg cartons and I put one pepper seed in each cup. Last year I had a very hard time thinning my pepper plants, and so to avoid that this year, I planted only one seed in each cup, and just planted more cups than I wanted plants, so that instead of snipping any extra plants later on, I could give extras away, or trade them for different varieties (not that I will have room for them, but...)
I covered the seed, moistened the soil, and put the complete carton in a plastic grocery bag, then I set the wrapped carton on the old carton's lid, which I hadn't cut into plant-specific sections. This way the old lid is a base keeping the cut up carton together, but because it is outside of the bag it doesn't get wet. Cost - free! The soil isn't the greatest, but I decided to spend my money on seeds this year, and use mixed garden soil and sand instead of buying potting or seed starting soil.
 Next I put the egg carton on the top of my freezer, and let the freezer be the gentle bottom heat the pepper seed packets recommended. Yesterday I noticed that some of the seeds are poking their newly germinated heads above ground, so I moved the carton out to the sunporch where I have my grow light set up. I'll keep monitoring them, since it is colder on the sunporch than I would really like, but until I get a heating pad to put under the seeds, that's the best I can do. If I notice them not doing well, I can always start moving them in to the dining room table every night, time consuming as that will be!

Simplifying my closet - Hot Spot #1

I'll be linking up with Project Simplify on this week's hot spot - my wardrobe! Here is a before shot of our master closet. My dresser sits in there so all my clothes are in there.

I didn't have a lot of time this week to do this project, but I'm happy to report that I accomplished a lot in a short time. I didn't have a whole lot of extra clothes, I really don't have many and most of the ones I have I wear a lot, but there were some that I bought second hand thinking I would love them and wear them lots but they just don't really fit or work with any other clothes that I have. Those ones got tossed!

Here are the clothes that are heading to our front hallway 'give away' shelf.

Luckily we did this over the xmas holidays with my husbands clothes, so his portion of our closet is looking better than it did previously as well. I was hoping to free one drawer of my dresser up, so that I could put wrapping paper in there to free up some space elsewhere, but I realized that's where I had my maternity clothes stored for future use. I guess the wrapping paper can stay out of my closet! Here are some of my after pictures:

I think the main thing I learned from this challenge is that I need to sort through my bedside table! Oh, and figure out somewhere to store or organize my jewelry! I kept pulling things out of my dresser that shouldn't have been there, and that ended up in my bedside table... They barely all fit, and likely should be somewhere else... perhaps in the next couple of weeks I'll get to the bedside table. But in the meantime, I can enjoy my tidy & roomy closet!

Thursday, March 10, 2011

Keeping a goal plan

One thing my Mom got me started on at some point in my late teen years was to come up with a goal plan of where, what, and who I wanted to be in 6 months, 1 year, and 3 years, and then sit down occasionally and go over it and make sure that I've been doing things to meet & keep me on track to meet these goals. This was when I was in my early university years. More recently in married life, where I can see further down the road, I have added a 'longer term' for distant future goals. I set goals to meet personal expectations, family dreams, and financial needs.

I try to review and update this goal plan every few months, depending on how busy I am and whether I need the added boost in my life of visualizing my family's future. I just keep a digital copy on my computer, although a paper copy on the fridge (where I keep lists of that sort - most people likely would put it in a homemaking binder) would make good sense if there were particular goals that I wanted to make sure I looked at everyday.

When I go through my goal plan, I update the date so that my file shows the last time I made changes change the goals as my goals change. Its encouraging to be able to go through and delete items that we have accomplished, and its also neat to look back at my older files, and see how my plans as changed (for example how they changed when I met my now husband, how they changed after I gave birth to our daughter, etc). I encourage anyone who doesn't write down their dreams, goals, and plans, to do so - it keeps you on track to meet them!

Wednesday, March 9, 2011

Our family's purpose statement

Well I'm a bit behind schedule, but I'll be following along with Simple Mom as Tsh simplifies 5 home hot spots in the next 5 weeks. This past weekend I should have sat down with my husband (and 3 dogs & 1 year old, but they don't usually have much constructive to say!) and we should have decided on our family's purpose statement, that describes our family's purpose so that things like cleaning and organizing can be prioritized and done based on what will help us as a family.

Well, with my husband working Friday's through Monday's, the amount of face time we get over the weekend isn't very high. That being said, I'm just now getting to writing about our purpose statement :)

After a busy evening visiting friends last night, we scheduled some time tonight to go over some ideas that I have come up with that might express both of our feelings on the topic. I figure we will spend a little bit of time composing our family purpose statement, and then I will pretty it up a bit and print it off for our fridge!

Tomorrow or Friday I will post about my progress on my wardrobe/closet hot spot (the first hot spot), and then I'll link up to Tsh's party on Friday! Hope to see you all there and we can celebrate our organizing and cleaning together!

Monday, March 7, 2011

Redesigning our old coop

I'm joining in on the homestead barn hop today to share the plans we've been working on for our chicken coop. The last week has been mostly warm and sunny during the day, although we did get about 4-6" of new fluffy snow that melted quickly from the south facing slopes. I've written about the coop before, here, so I won't go into detail about its history with us, but I will share what we have planned for its future!

One sunny afternoon last week my husband cut down the 2 dead willows that were standing beside the coop, and cut the nicely dried trunk up for firewood. When I got home from work one day to find Little M supervising from the porch as my husband cleaned up the last of the trunk, I was motivated to grab my tape measure and head on over to the coop.
He still has some work to do out there once the snow melts to clean up all the dead branches and sticks, but in the meantime the dogs have been enjoying chasing each other around and playing with the sticks. Remi (ever the bird dog) loved keeping an eye on what I was doing in the coop.
That was the first of several trips back and forth this past week from the house to the coop. Since my husband really enjoyed having the pheasants for the past 2 years, we decided this fall to split the coop into 2 areas - one for chickens, and one for pheasants. Initially I was worried that the coop wasn't big enough for both, but after my first measurements put the coop at just over 50 square feet, I wasn't worried any more. To make my life easier, I decided to have a little entry area as well so I didn't have to worry about the birds getting out when I went to water or feed them, and so there was a space for storing their food and other associated items. The coop is filthy and really needs some TLC; my husband still needs to clean it out from the past 2 summers of pheasants before I will start doing any building in there, and there are several wall roosts that he constructed for pigeons when he had some of them housed in there last spring that will have to come down.
I've got my chick order ready, but we still haven't decided whether we want them soon or after our late spring family vacation (so that we don't have to have a house-sitter while we are gone). I have a list of several breeds, totaling 25 chicks so that they don't get too cold en route.  I know I won't be keeping 25 laying chickens, and in fact several of the breeds I will order as straight run, even though we aren't interested in any roosters (my late-shift-working husband said he doesn't want to be woken up at dawn, thanks very much!). We plan to use some of the chickens as meat chickens, which is why I am mostly ordering breeds that are good for meat and laying.

What I've read suggests that chickens need about 1 square foot each, so if I managed to have a chicken area that was about 20-25 sf there would be enough room for the 25 meat & laying chickens during the summertime when they will be able to go outdoors, and plenty of room in the wintertime when I will drop down to about a dozen laying hens. I expect in the summer the birds will spend a lot of their time outside in their fully enclosed run (more details to come on the outdoor space!).

I won't bore you with all the measurements and lumber amounts, but here is a pic I took of the finalized plan I worked out this past weekend in my trusty notebook to give you an idea of what things are shaping up like. I've got separate sheets with the new wall dimensions worked out as well so I know how much wood & chicken wire mesh I need, but I still have to work out the laying boxes and exit door & ramp for the chickens.
Saturday, March 5, 2011

Drooling over Wall Decorations

I wanted to share this cool etsy shop that I found through a recent post over at NewlyWoodwards. I checked out the link there to Lindsay and her husband Aubrey's blog which I am really enjoying, but Lindsay also makes the most adorable prints at her etsy shop. Check her out! Aren't the alphabet name prints so cute?! I want one for Little M! I also love that she is Canadian, just like me :) (can you tell I've been living in the US for long enough that I think Canadians are scarce?) I may just have to try to recreate one of those prints at home, since there isn't any room in the budget to buy one in the near future (darn those budget priorities!).

In other wall hanging news, I've been doing a lot of drooling over all the art & photo gallery walls that are so popular around the blogging world, and I've been dreaming of putting one up on our long, bare wall. (Please ignore the 2 sad lonely frames currently occupying that space!) I think a wall of art & photos could make this space really great.
Oh, and check this out. While I was writing this I realized that I didn't have any great pictures of just that portion of wall, and this pic below was the closest I could find. I snapped this pic the day before Valentine's Day, that's Little M scooting down the hallway getting ready for her photo shoot for Grammy. What stunned me was how different the hallway looks compared to before (most of) the black trim went up! Wow. I love how crisp the new look is!

Friday, March 4, 2011

Checking germination in older onion seeds

Last spring a friend gave us some onion seeds he had saved from the summer before. I used about half of them last year. I also saved seeds from some onion sets that we had bought and planted last year. So this year I have 2 types of onion seeds to grow, but onion seeds don't last very well, so before I spend my time on them and give them space, I decided to check their germination rates.
This evening after I put Little M down, I got both types of seeds out, and gathered together a tupperware container, some paper towels, and a spray bottle of water. First I put a folded paper towel in the container, then sprayed it to get it damp. I put a dozen or so of the older seeds in the paper towel 'envelope', and then folded the paper towel over top, and sprayed it again. Then I did the same with the seeds I saved from last year. I sat the lid lightly on top of the container to keep the moisture levels up in our dry climate, and set the container at the back of the counter. Now I wait about 5 days or so, and check the percentage of seeds that have germinated. I didn't need to check the newer seeds, but I figured it would give me a control so I knew whether the old ones should be germinated.
Hopefully they will both germinate fine, but if not, this way I will know whether I should seed them denser than normal, or toss the seeds entirely if they don't do well on this germination test. I still haven't decided whether I want to start my onions inside early or direct seed them later...

Wednesday, March 2, 2011

Guest blogging over at R-Dub Outdoors!

Yup, the baby is wearing earmuffs!
Today I am guest blogging over at R-Dub Outdoors, my husband's gear testing & outdoor adventure blog. I'm writing about my experiences learning to hunt, so head on over and check out my post: The start of a hunting mama.